SeekBeak is excited to announce we now offer the ability to use custom domain names or subdomains for your 360 photos. Now you have the option for users to see your domain name, rather than SeekBeak.com, when they access your 360 photos and tours.
Now, you can elevate your users’ experience and offer a seamless white-label solution with SeekBeak’s latest feature: custom domain names or subdomains for your 360 photos and tours.
For instance, imagine having your photos hosted on “https://www.yourclient.com” instead of SeekBeak.com. Your clients will never know you’re using SeekBeak’s backend system to manage the content, giving you full control over the user experience.
Some plans include one free Custom Domain name, and other plans can use it as an optional Add-On. Access the Add-Ons from your account settings from within your dashboard.
#Protip: Teams can leverage multiple Custom Domain Add-Ons, allowing for different domains for various purposes while showcasing the same or different content.
If you are subscribed to a plan which includes the Custom Domain Add-On or has purchased a Custom Domain Add-On, simply follow the guide below on how you can set up your custom domain name today!
How To Set Up a Custom Domain Name
Step 1: Create a CNAME Record for SeekBeak
In order to use a custom domain name with SeekBeak, you have to already own the domain name you would like to use and have access to the DNS records for it. You can access DNS records by logging into your domain provider.
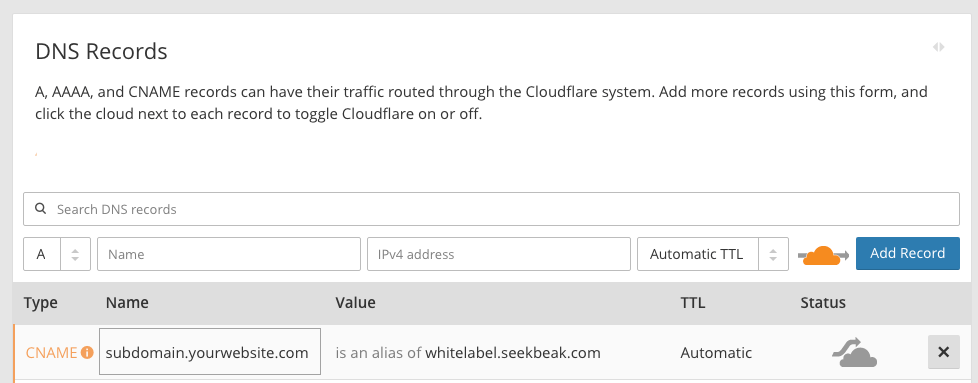
First, you’ll need to create a CNAME record in your DNS settings, which basically points your domain name to SeekBeak.
Your CNAME record needs to point to whitelabel.seekbeak.com
The screenshot below shows how you would set this up using Cloudflare. Most hosting providers will offer help on how to set this up on their systems.
If you are using Cloudflare or another platform that supports Proxying or caching, it must be turned OFF.
In Cloudflare, this is shown as the grey cloud under “Status” in the screenshot below.
Most domain providers have a guide for adding a CNAME to help walk you through the process. Here are the guides for a few of the major providers.
- How to Add a CNAME on Godaddy: https://godaddy.com/help/add-a-cname-record-19236
- How to Add a CNAME on Dreamhost: https://help.dreamhost.com/hc/en-us/articles/360035516812
- How to Add a CNAME on Cloudflare: https://support.cloudflare.com/hc/en-us/articles/200169046-How-do-I-add-a-CNAME-record-
If you want to register a top-level domain, i.e. mydomain.com, (without a .www or other subdomain), things become a bit more complicated. You will need to find a host which supports CNAME Aliases, or CNAME Flattening, like Cloudflare. You must then create CNAMES for both the www.mydomain.com and mydomain.com, and register the www.mydomain.com with SeekBeak in the next step.
Another workaround is to create a single CNAME for www.mydomain.com, then configure your registrar to forward mydomain.com to www.mydomain.com.
Don’t worry about having to enter the www into SeekBeak. Once your Custom Domain is all setup, you’ll be able to access your domain via both www and www-less names.
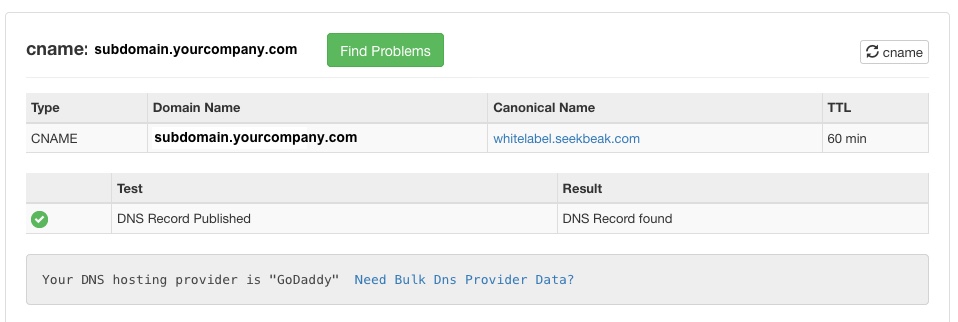
In the next step, SeekBeak will verify that your domain is set up correctly before it adds the Custom Domain. There’s a free tool https://mxtoolbox.com/CNAMELookup.aspx which you can use as well to see if things are set up correctly beforehand.
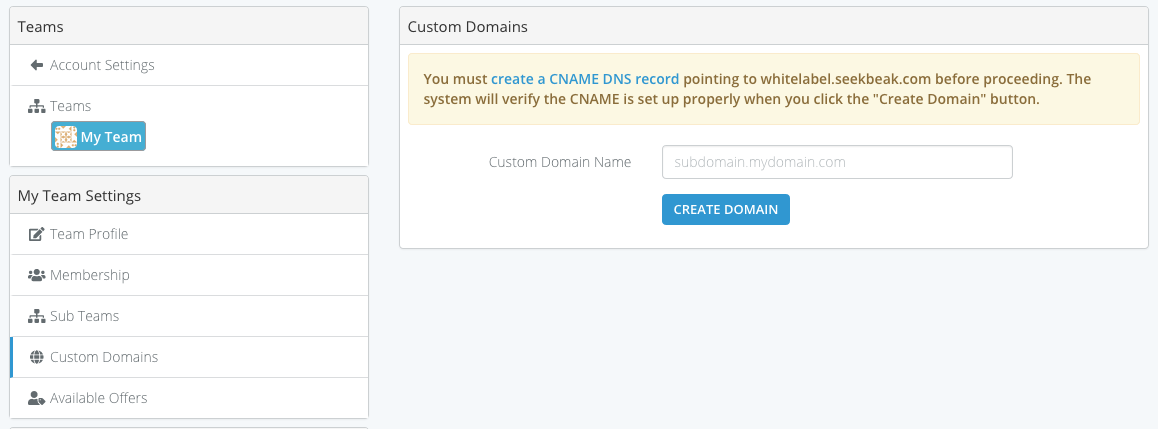
Step 2: Register Your Domain in SeekBeak
Once your CNAME is set up and active, you can add it to your SeekBeak account via the Team Settings -> Custom Domains tab. Enter your new domain name and click “Create Domain”. SeekBeak will verify that your CNAME is set up correctly. Remember to leave enough time for your CNAME changes to propagate across the internet, DNS changes can sometimes take up to a day to take effect!
Step 3: Wait for SSL Verification
Once your Custom Domain has been validated, it may take another day or two for the SSL certificates to be installed by our crack team of security experts. Once your SSL certificates are installed, and the CNAME is good to go, the “Active” light will turn green, and you’ll be able to use your own Custom Domain instead of seekbeak.com.
Step 4: Login and Go!
Now you can log in via “https://subdomain.yourdomain.com/login” and use the platform as you normally do. Links you share, when logged into your new domain, will use your new domain name instead of SeekBeak. Social Media sites will now also display your website name when you share content, promoting your brand even more.
Bonus Tip: Enhance User Experience with Root URL Redirects
By default, when visitors access “https://subdomain.yourdomain.com,” they encounter your login page, which may not always be ideal. With our feature, the “Root URL Redirect,” you can effortlessly redirect them to any other link.
After logging in via your Custom Domain, navigate to the Custom Domains area and fill in the Root URL Redirect field with your desired URL.
Now, instead of landing on your login page, visitors will be seamlessly redirected to the specified URL when accessing your custom domain directly!
And that’s it! We’ve tried to make it as easy as possible for you to hook up your own custom domains. Please contact us if you have any questions.

Introducing: SeekBeak Enterprise! – SeekBeak – Virtual Tour & 360 Image Creator says:
[…] can now completely strip all SeekBeak branding from the platform, including URLs, and set up their own branded 360 platform. Use our easy-to-use technology to host multiple […]
Andrew Lyons says:
Is it possible to have a sub domain point to Seekbeak? i.e have my main website at “xyz.com” and point “tours.xyz/com” to Seekbeak..
Tim Allan says:
Absolutely, that’s exactly what our custom domain features offers!
Andy says:
Does this custom-domain feature shows shows my own domain url on the browser itself, not masking it?
Tim Allan says:
Yep, that’s exactly what it does, show your own domain name instead of ours.
Phil says:
If I have an enterprise license do I get one or two free Custom Domain names?
Tim Allan says:
Enterprise plans are all customized for whatever you need. Feel free to hit us up via our support/contact channels, we’d be happy to chat!
Jerry says:
Very Nice Blog..!! Thank you for sharing this information with us. It is very useful and important information for those who are doing this work for the first time.
Tim Allan says:
You’re very welcome Jerry!
Mary says:
This is a great solution for those who want to host their 360 photos and create virtual tours. SeekBeak makes it easy to embed media and track users.
Alex says:
This is a great platform for hosting your 360 photos and creating virtual tours. Embed media, track users, and more.